2. Compiling GATE V9.4.2
This section describes the installation procedure of GATE. This includes three steps:
Install Geant4
Install ROOT
Install GATE
This section starts with a brief overview of the recommended configurations, followed by a short introduction to the installation of Geant4, and then explains the installation of GATE itself on Linux.
It should be highlighted that features depending on external components (libraries or packages) may only be activated if the corresponding component is installed. It is the user’s responsibility to check that these components are installed before activating a feature. Except for Geant4, which is closely related to GATE, the user should refer to the Installation Guide of the external components.
In addition, you should also install any Geant4 helper you wish to use, especially OpenGL if required, before installing Geant4 itself. You can either download the source codes and compile the libraries or download precompiled packages which are available for a number of platform-compiler. If you choose to or have to compile the packages, you will need:
a C++ compiler (new enough to compile code with the C++11 standard)
the GNU version of make
CMAKE tool (3.3 or newer)
The ROOT data analysis package may also be needed for post-processing or for using the GATE online plotter (enabling the visualization of various simulation parameters and results in real time). ROOT is available for many platforms and a variety of precompiled packages can be found on the ROOT homepage. If your gcc compiler is version 6 or newer, then you should use a recent ROOT 6 release.
The LMF and ecat7 packages are also provided on the GATE website. They offer the possibility to have different output formats for your simulations. Note that this code is very old and not supported by the Gate collaboration, only provided “as is”. With newer compilers you may have to do some minor hacking (for ECAT you may need to add compiler flags to select the C90 standard, for instance).
2.1. Direct dependencies of GATE
For compiling GATE V9.4.2, the required dependencies are
Geant4 11.4.0 (available in http://geant4.web.cern.ch/geant4/support/download.shtml).
ROOT (ROOT 6.xx) # still required
Geant4 needs to be compiled. ROOT is avalaible as binary on some platform (or has to be compiled)
Optional packages
CLHEP 2.3.4.3  # by default the one provided in Geant4 is used
ITK (version 5.xx or later)
ECAT
LMF
libTorch # see section below
2.2. Packages required in order to compile dependencies and GATE
Compiling software usually requires certain system libraries and compilation tools. Furthermore, GATE and Geant4 have various package requirements which have to be met BEFORE installing or compiling.
Please find instructions here : Installation of required dependendencies on some specific platforms. Adapt instructions to your platform.
2.3. CLHEP
Since the GATE V7.0 release, users can use the CLHEP embedded within each Geant4 distribution. This case, the CMAKE flag GEANT4_USE_SYSTEM_CLHEP, which is OFF by default, must stay OFF.
However, users can use an external CLHEP version (2.3.4.3) by turning flag GEANT4_USE_SYSTEM_CLHEP ON and following the CLHEP installation procedures: http://proj-clhep.web.cern.ch/proj-clhep
2.4. Geant4
First, download the Geant sources at this address: http://geant4.web.cern.ch/
During the cmake: QT and OPENGL are optional. We recommand to set GEANT4_INSTALL_DATA.
Finally, update your environment variables file with the following command lines:
bash or zsh:
source /PATH_TO/geant4.11-install/bin/geant4.sh
[t]csh:
source /PATH_TO/geant4.11-install/bin/geant4.csh
For details, read the official GEANT4 installation procedure.
2.5. ROOT
You can download ROOT at the following address: https://root.cern.ch/downloading-root
It is recommended to install directly the ROOT binaries. Users have to compile the ROOT sources only if necessary.
Depending on your environment, you need to source ROOT as follow (this final step is summarized in the item 5 of this documentation):
bash or zsh:
source /PATH_TO/root_v6.xx/bin/thisroot.sh
[t]csh:
source /PATH_TO/root_v6.xx/bin/thisroot.csh
2.6. libtorch (optional)
The goal is here to make Gate use the torch library, an open source machine learning framework : https://pytorch.org
Pytorch is usually used via a Python module, but here we need an additional library named ‘libtorch’ that will be used by Gate during compilation.
To download ‘libtorch’, go to https://pytorch.org at the section QUICK START LOCALLY, and select PyTorch Build stable, Your OS, Package libtorch, Language C++, your CUDA version if you have CUDA installed on your computer or None if you want to use only your CPU (Note: GATE is currently using only CPU with libtorch). Then download the zip archive. For Linux platform you can choose between Pre-cxx11 ABI or cxx11 ABI versions according to your gcc version. If you cannot compile (or link) Gate with the former version, try the latter version. Finally unziped somewhere on your disk. No compilation required here.
Then, during the installation of Gate (next section) use the following option to set the path to libtorch
GATE_USE_TORCH     ON
Torch_DIR          /home/YOURNAME/libtorch-1.10.1/share/cmake/Torch
In some configuration, the following path should also be set
CUDNN_INCLUDE_DIR  /home/YOURNAME/cuda/include
CUDNN_LIBRARY      /home/YOURNAME/cuda/lib64/libcudnn.so
We recommend you to use libtorch version 1.10.1 but other version may works. You can download libtorch from (pytorch)[https://pytorch.org/get-started/locally], select “LibTorch” in the matrix.
2.7. GATE V9.4.2
First, download the GATE sources at this address: https://github.com/OpenGATE/Gate/archive/v9.4.2.zip Unzip the downloaded file:
unzip Gate-9.4.2.zip
Alternatively, if you are familiar with git, then instead of downloading and extracting the tar file, you can also clone the sources from github and check out the v9.4.2 release tag.
git clone https://github.com/OpenGATE/Gate.git Gate cd Gate git checkout v9.4.2
Create two directories to build and install GATE:
mkdir gate-build
mkdir gate-install
Move into the GATE build directory:
cd gate-build
Run ccmake as follows:
ccmake ../Gate-9.4.2
You need to change the CMAKE_INSTALL_PREFIX, it should be set to the install directory (defined above). The default given by CMake is /usr/local; if you have root/sudo permissions on your machine then it’s possible to install Gate there, but it’s not recommended, especially if you need to work with more than one version of Gate (for instance, if you want to do development on Gate, or if you want to verify that a new release is compatible with the old release that you have been using). You should get something like this (the screen shot is taken from the 8.0 release, the only difference is the version number):
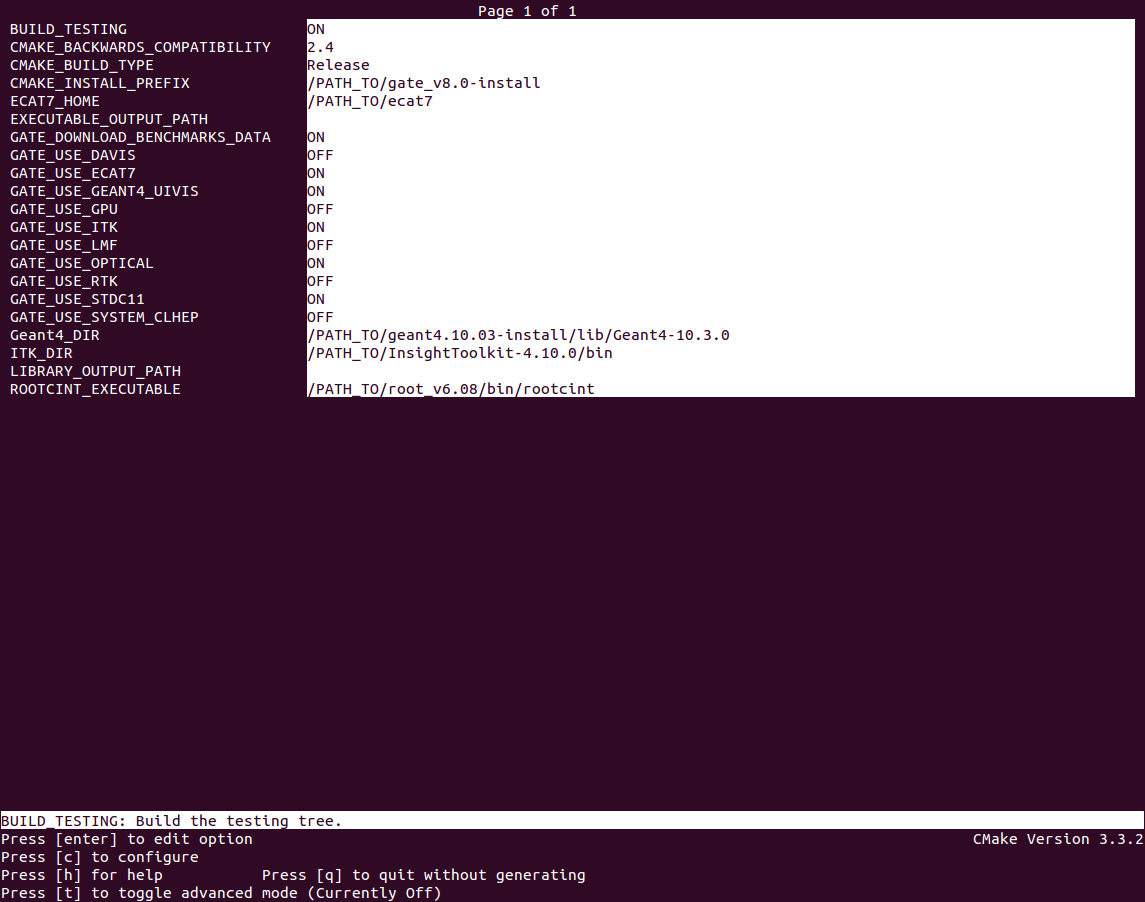
Warning Information about following environment variables:
BUILD_TESTING                      OFF: by default, set to ON if you want to perform build testing
GATE_USE_ECAT7                     OFF: by default, set to ON if you want to use this library
GATE_USE_ITK                       OFF: by default, set to ON if you want to access DICOM reader and thermal therapy capabilities
GATE_USE_LMF                       OFF: by default, set to ON if you want to use this library
GATE_USE_OPTICAL                   OFF: by default, set to ON if you want to perform simulation for optical imaging applications
GATE_USE_RTK                       OFF: by default, set to ON if you want to use this toolkit
GATE_USE_DAVIS                     OFF: by default, set to ON if you want to use the Davis LUT model
GEANT4_USE_SYSTEM_CLHEP            OFF: by default, set to ON if you want to use an external CLHEP version
As it was the case for Geant4, press ‘c’ to configure (you may need to do this multiple times) and then ‘g’ to generate the compilation environment.
Finally:
make -jN (N is the number of processor(s) in your PC)
make install
Finally, update your environment variables file with the following command lines: (this part is summarized in the item 5 of this document)
bash or zsh:
export PATH=/PATH_TO/gate-install/bin:$PATH
[t]csh
setenv PATH /PATH_TO/gate-install/bin:${PATH}
2.8. Environment configuration and starting GATE
We highly recommended to create a gate_env.sh (or gate_env.csh if you are a [t]csh user) file to set up all environment variables which are mandatory to perform a full GATE simulation, and save this file in the bin directory of your Gate installation. (In future releases of Gate we hope to provide such an environment setup file automatically.)
This file should be defined as follows:
bash or zsh:
source /PATH_TO/root_v6.XX/bin/thisroot.sh
source /PATH_TO/geant4.11-install/bin/geant4.sh
export PATH=$PATH:/PATH_TO/gate-install/bin
# the following lines only if you are using an external CLHEP library (and similar for ITK, if you enabled it):
export PATH=$PATH:/PATH_TO/2.3.4.3/CLHEP/bin
export LD_LIBRARY_PATH=$LD_LIBRARY_PATH:/PATH_TO/2.3.4.3/CLHEP/lib
csh or tcsh:
source /PATH_TO/root_v6.XX/bin/thisroot.csh
source /PATH_TO/geant4.11-install/bin/geant4.csh
setenv PATH ${PATH}:$/PATH_TO/gate-install/bin
# the following lines only if you are using an external CLHEP library (and similar for ITK, if you enabled it):
setenv PATH ${PATH}:/PATH_TO/2.3.4.3/CLHEP/bin
setenv LD_LIBRARY_PATH ${LD_LIBRARY_PATH}:/PATH_TO/2.3.4.3/CLHEP/lib
Save this file in /PATH_TO/gate_v9.4.2-install/bin. Finally, before to start a GATE session:
source /PATH_TO/gate-install/bin/gate_env.sh
In order to save typing, you may want to define an alias for that: include the following line in your $HOME/.bashrc or $HOME/.bash_aliases file:
alias gate92='source /PATH_TO/gate-install/bin/gate_env.sh'
(For csh and tcsh the syntax is different but the idea is the same.)
With your shell environment properly set up, you should be able to run Gate. To try it out, just start it without any arguments:
Gate
! If you are using the Qt interface on non-English locales then you must force Qt to use a locale with a dot for the decimal separator:
LC_NUMERIC=C Gate --qt
2.9. ITK
See: https://itk.org and follow the instructions.
Here are some additional cmake options:
ccmake -DITK_USE_REVIEW=ON ..
You will obtain the following screen and you need to configure the different options as follows:
BUILD_EXAMPLES                   OFF
BUILD_TESTING                    OFF
ITKV3_COMPATIBILITY              OFF
ITK_BUILD_DEFAULT_MODULES        ON
ITK_WRAP_PYTHON                  OFF
2.10. ECAT7
First, create and enter an ecat7 sub-directory:
mkdir /PATH_TO/ecat7
cd /PATH_TO/ecat7
Download the ECAT library sources at this address:
http://www.opengatecollaboration.org/ECAT
Unzip and untar the downloaded file:
tar -xzf ecat.tar.gz
WARNING: if you want to use ECAT7 output module, don’t forget to set CMake option GATE_USE_ECAT7 to ON and to provide the path to ECAT7 source directory (i.e /PATH_TO/ecat7)
Copy the right Makefile.<os> to Makefile. If Makefile exists this step is not necessary:
cp Makefile.unix Makefile
Compile:
make
This will build the library
Go to the utils directory Copy the right Makefile.<os> to Makefile if Makefile exists this step is not necessary:
cp Makefile.unix Makefile
Compile (do not use make -j4 !!!):
make
This will create some utility programs
After compilation, create the following folder: include/:
mkdir /PATH_TO/ecat7/include
In this folder copy all *.h files:
cp *.h /PATH_TO/ecat7/include
Check that the file libecat.a is in lib/. If it isn’t copy it there:
mkdir lib
cp libecat.a lib/
2.11. LMF 3
(Disclaimer: the LMF code and build instructions are provided “as is”, we do not give an warranty of it’s correctness or usefulness for any purpose, and do not officially support LMF.)
Enter the source directory:
/PATH_TO/lmf_3_0
Configure lmf
./configure
Make sure that you have ROOT in your environment. If this is not the case yet, then run source /PATH/TO/ROOT/bin/thisroot.sh (change the “path to root” according to your local ROOT installation). Then edit the makefile to inform the modern compiler on your machine that the code is antique:
obj/%.o : src/%.c
        gcc $(CFLAGS) -std=c99 -c -o $@ $<

obj/outputRootMgr.o : src/outputRootMgr.cc
        gcc $(CFLAGS) $(ROOTCFLAGS) -std=c++98 -c -o $@ $<

obj/%.o : src/%.cc
        gcc $(CFLAGS) -std=c++98 -c -o $@ $<
(And be careful, it’s important that the whitespace in front of each gcc is a TAB; if you use normal spaces then it won’t work!)
Compile (do not use make -j4 !!!):
make clean
make
If it does not exist, after compilation create the following folder: includes:
mkdir /PATH_TO/lmf_3_0/includes
In this folder copy all *.h files, if they aren’t in there already:
cp *.h /PATH_TO/lmf_3_0/includes
Check that the file libLMF.a is in lib/ If it isn’t copy it there
2.12. Installation of cluster tools
2.12.1. jobsplitter
Go to /PATH_TO/gate_v9.4.2/cluster_tools/jobsplitter:
cd /PATH_TO/gate_v9.4.2/cluster_tools/jobsplitter
Make sure ROOT and Geant4 environment variables are set:
source /PATH_TO/root_v6.XX/bin/thisroot.sh
source /PATH_TO/geant4.11-install/bin/geant4.sh
Compile:
make
Copy the gjs executable file to the correct place:
cp /PATH_TO/gate_v9.4.2/cluster_tools/jobsplitter/gjs /PATH_TO/gate_v9.4.2-install/bin
2.12.2. filemerger
Go to /PATH_TO/gate_v9.4.2/cluster_tools/filemerger Make sure ROOT and Geant4 environment variables are set:
source /PATH_TO/root_v6.XX/bin/thisroot.sh
source /PATH_TO/geant4.11-install/bin/geant4.sh
Compile:
make
Copy the gjs executable file to the correct place:
cp /PATH_TO/gate_v9.4.2/cluster_tools/filemerger/gjm /PATH_TO/gate_v9.4.2-install/bin