Introduction
GATE a Monte-Carlo simulation toolkit for medical physics applications
Forewords
Monte Carlo simulation is an essential tool in emission tomography to assist in the design of new medical imaging devices, assess new implementations of image reconstruction algorithms and/or scatter correction techniques, and optimise scan protocols. Although dedicated Monte Carlo codes have been developed for Positron Emission Tomography (PET) and for Single Photon Emission Computerized Tomography (SPECT), these tools suffer from a variety of drawbacks and limitations in terms of validation, accuracy, and/or support (Buvat). On the other hand, accurate and versatile simulation codes such as GEANT3 (G3), EGS4, MCNP, and GEANT4 have been written for high energy physics. They all include well-validated physics models, geometry modeling tools, and efficient visualization utilities. However these packages are quite complex and necessitate a steep learning curve.
GATE, the GEANT4 Application for Tomographic Emission (MIC02, Siena02, ITBS02, GATE, encapsulates the GEANT4 libraries in order to achieve a modular, versatile, scripted simulation toolkit adapted to the field of nuclear medicine. In particular, GATE provides the capability for modeling time-dependent phenomena such as detector movements or source decay kinetics, thus allowing the simulation of time curves under realistic acquisition conditions.
GATE was developed within the OpenGATE Collaboration with the objective to provide the academic community with a free software, general-purpose, GEANT4-based simulation platform for emission tomography. The collaboration currently includes 21 laboratories fully dedicated to the task of improving, documenting, and testing GATE thoroughly against most of the imaging systems commercially available in PET and SPECT (Staelens, Lazaro).
Particular attention was paid to provide meaningful documentation with the simulation software package, including installation and user’s guides, and a list of FAQs. This will hopefully make possible the long term support and continuity of GATE, which we intend to propose as a new standard for Monte Carlo simulation in nuclear medicine.
In name of the OpenGATE Collaboration
Christian MOREL CPPM CNRS/IN2P3, Marseille, 2004
Overview
GATE combines the advantages of the GEANT4 simulation toolkit well-validated physics models, sophisticated geometry description, and powerful visualization and 3D rendering tools with original features specific to emission tomography. It consists of several hundred C++ classes. Mechanisms used to manage time, geometry, and radioactive sources form a core layer of C++ classes close to the GEANT4 kernel Fig. 1. An application layer allows for the implementation of user classes derived from the core layer classes, e.g. building specific geometrical volume shapes and/or specifying operations on these volumes like rotations or translations. Since the application layer implements all appropriate features, the use of GATE does not require C++ programming: a dedicated scripting mechanism - hereafter referred to as the macro language - that extends the native command interpreter of GEANT4 makes it possible to perform and to control Monte Carlo simulations of realistic setups.
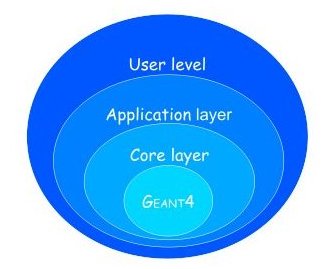
Fig. 1 Structure of GATE
One of the most innovative features of GATE is its capability to synchronize all time-dependent components in order to allow a coherent description of the acquisition process. As for the geometry definition, the elements of the geometry can be set into movement via scripting. All movements of the geometrical elements are kept synchronized with the evolution of the source activities. For this purpose, the acquisition is subdivided into a number of time-steps during which the elements of the geometry are considered to be at rest. Decay times are generated within these time-steps so that the number of events decreases exponentially from time-step to time-step, and decreases also inside each time-step according to the decay kinetics of each radioisotope. This allows for the modeling of time-dependent processes such as count rates, random coincidences, or detector dead-time on an event-by-event basis. Moreover, the GEANT4 interaction histories can be used to mimic realistic detector output. In GATE, detector electronic response is modeled as a linear processing chain designed by the user to reproduce e.g. the detector cross-talk, its energy resolution, or its trigger efficiency.
The first users guide was organized as follow: chapter 1 of this document guides you to get started with GATE. The macro language is detailed in Chapter 2. Visualisation tools are described in Chapter 3. Then, Chapter 4 illustrates how to define a geometry by using the macro language, Chapter 5 how to define a system, Chapter 6 how to attach sensitive detectors, and Chapter 7 how to set up the physics used for the simulation. Chapter 8 discusses the different radioactive source definitions. Chapter 9 introduces the digitizer which allows you to tune your simulation to the very experimental parameters of your setup. Chapter 10 draws the architecture of a simulation. Data output are described in Chapter 11. Finally, Chapter 12 gives the principal material definitions available in GATE. Chapter 13 illustrates the interactive, bathc, or cluster modes of running GATE.
The GATE mailing list
You are encouraged to participate in the dialog and post your suggestion or even implementation on the Gate-users mailing list, the GATE mailing list for users. You can subscribe to the Gate-users mailing list, by signing up to the gate-users mailing list.
If you have a question, it is possible that it has been asked and answered before, and stored in the archives or old archives. These archives are public and are indexed by the usual search engines. By starting your Google search string with site:lists.opengatecollaboration.org you’ll get list of all matches of your search on the gate-users mailing list, e.g. site:lists.opengatecollaboration.org pencilbeam.
The GATE project on GitHub
GATE project is now publicly available on GitHub. You can use this to:
Check out the bleeding edge development version
Report bugs by creating a new issue. (If you are not entirely sure that what you are reporting is indeed a bug in Gate, then please first check the gate-users mailing list.)
Contribute to Gate by changing the source code to fix bugs or implement new features:
Get a (free) account on GitHub, if you do not have one already.
Install Git on the computer where you do your development, if it has not yet been installed already. And make sure to configure git with your name and with your email address.
Start by making a fork of the GATE public repository (click the “Fork” button in the upper right corner on the Gate main page on GitHub.
Note that we use the develop branch to collect all the bleeding edge developments and the master to track the releases. In the future we may merge these two, and use only master, like it’s done in most other projects on GitHub. Releases are defined using “tags”.
Then clone your own fork: git clone https://github.com/YOUR_USERNAME/Gate.git to get the code on the computer that you will use to develop and compile Gate.
Make a new branch, dedicated to the bugfix or new feature that want to implement in Gate. You can either create the branch first on GitHub and then git pull it to your clone, or create it directly in your clone and git push it later. Make sure that your branch is based on the develop branch. Note that after creating your branch you also need to check it out.
With git branch -l you can check which branches are available in your clone and which one is currently checked out. With git checkout <branchname> you can change between branches. Be careful not to do this when you still have uncommitted changes (unless you deliberately want to undo those changes).
Now: implement your bugfix or your new feature and commit your changes to your new branch. It’s usually better to make many small commits than a single big one (though it is of course also desirable that every commit leaves the code in a compilable state). Please provide concise but informative commit messages ! Use git push to upload your commits to (your fork on) GitHub. This facilitates developing on multiple machines and also avoids loss of time and effort in the unfortunate event of a hardware failure.
If you are working for a longer time on your fix or new feature, like a few days, weeks or even months, then it is important to make sure to keep your fork in sync with the upstream repository.
Once you are convinced that your code is OK, make sure it’s all pushed to your fork on GitHub. Then:
Create a pull-request from the branch on your Gate repository to the official Gate repository
Provide an example that tests your new feature
If you implemented a new feature, have the associated documentation ready
Inform these three people from the collaboration (Sebastien Jan, David Sarrut and David Boersma) who will then get in touch with you to integrate your changes in the official repository.
For your next bugfix or new feature you do not need to make a new fork, you can use the existing one. But before doing any new work you should make sure to synchronize the develop branch in your fork with the “upstream” (main) develop branch:
Check your “remote repositories” with git remote -v
The “origin” repository should be your own fork on GitHub, https://github.com/YOUR_USERNAME/Gate.
The “upstream” repository should be the main Gate one, that is https://github.com/OpenGATE/Gate.
If your clone does not yet have an “upstream”, then add it with git remote add upstream https://github.com/OpenGATE/Gate.
Run git status to make sure that you checked out the develop branch, and git pull to make sure that it is in sync with your fork on GitHub and that there no uncommitted edits.
Then run git fetch upstream, followed by git merge upstream/develop.
Now you are ready to create new branches for new bugfixes and features.
For more detailed references, recipes, and tutorials on git: please check the web. When copypasting commands, remember that in Gate the “develop” branch currently plays the role of the “master” branch. Our “master” branch is used to track the releases. You will not find the latest bleeding edge code on it. We may change this policy in the near future, to be more conforming to the predominant conventions.
GateRT
Some examples could be found here : https://davidsarrut.pages.in2p3.fr/gate-exercices-site/
Disclaimer: the tools dedicated to radiation therapy simulations provided in this GATE release are provided “as is” and on an “as available” basis without any representation or endorsement made and without warranty of any kind.
Location: The examples are located in the source code into to the folder : Gate/examples/example_Radiotherapy/.
Proton therapy examples:
Example 4 : Beam optics simulation in vacuum for a pencil beam + depth-dose profile in water. A root macro is provided to analysis the produced phase space files (PhS-Analysis.C).
Example 5 : Treatment plan simulation of proton active scanning beam delivery (TPSPencilBeam source). A root macro is provided to analysis the produced phase space files (PhS-Analysis.C).
Example 6 : Example of proton pencil beam in heterogeneous phantom (water, bones, Lung) with Pencil Beam Scanning source: comparison between dose to water and dose to dose to medium.
Carbon ion therapy examples:
Example 1 : Example of Carbon beam in water tank or in patient CT image. Output is a 3D dose distribution map (with associated statistical uncertainty) and map of produced C11.
Photon/electron therapy examples:
Example 2 : Example of photon beam in patient CT image. Output is a 3D dose distribution map (with associated uncertainty). Two different navigators are tested NestedParameterized and Regionalized, with two number of materials). (This example is similar to the example1 presented on the wiki web site of Gate V6.1)
Example 3 : Example of photon beam in patient CT image with IMRT irradiation. 100 slices with different MLC positions. (This example is similar to the example2 presented on the wiki web site of Gate V6.1)
Example 7 : Example to use repeater/mover and both at the same time. (This example is similar to the example5 presented on the wiki web site of Gate V6.1)
Example 8 : Photon beam from a Linac into a box with water/alu/lung. See Figure4 from [Jan et al PMB 2011].
Example 9 : Electron beam from a Linac into a box with water/alu/lung. See Figure5 from [Jan et al PMB 2011].
Radiography examples:
Example 10 : Radiography of a thorax phantom. Outputs are 3D dose distribution maps computed with the classical method and the accelerated (TLE) method.